Installing an RS40
Devices running RIOS must have a management connection to an rWeb Server. Before installing your device, please make sure you have properly configured rWeb and have all of its relevant network information handy (IP address and net mask). In addition, you will need to make sure the following ports are unblocked, or the filter device will not start correctly:
- UDP Destination Port 123 (NTP)- This is required for synching operations between the rWeb and filter device. By default, the filter device talks to two RioRey NTP Servers at 65.216.233.249 and 194.58.204.148 (this can be changed).
- UDP Destination Port 61166 (Flow Sampling and Control)- This is how the rWeb and filter device monitor traffic and collect data.
- UDP/TCP Destination Port 61167 (Filter List Data Exchange)- This is how rWeb and the filter device exchange information on IPs blocked by Clear Filter List (RIOS 5.6.0 or greater).
- TCP Destination Port 8022 (Management Control)- This is how rWeb issues commands to the filter device.
Hardware Setup
- Get a laptop or other computer that has Internet access that you will use for configuring your RS unit. Using your computer, go to the RioRey website located at: http://www.riorey.com. Login as a customer using your credentials. You will be able to access the latest software and technical notes.Go to Download > Latest RIOS. Download the latest version of RIOS to your local machine. Do not unzip this file.
- Check the boxes for the following components:
- One (1) RS 40 Unit
- One (1) RioRey Tool Kit bag containing:
- Two (2) RS AC Power Cords
- Mount the RS in a 19” rack with 2U space.
- Connect the two (2) AC power cords into the back of the RS unit. Wait 5-10 minutes for the unit to power up completely. The RS is ready for the rest of the setup process when the front panel LED begins blinking Green.
Configure RS40 Management IP
Get a laptop with a standard shell or terminal program, and a Cat5e ethernet cable. Configure your laptop to have an IP address other than 192.168.1.1 in the 192.168.1.0/24 subnet.
Connect your laptop using a CAT5e cable to the RS Management Port as shown:
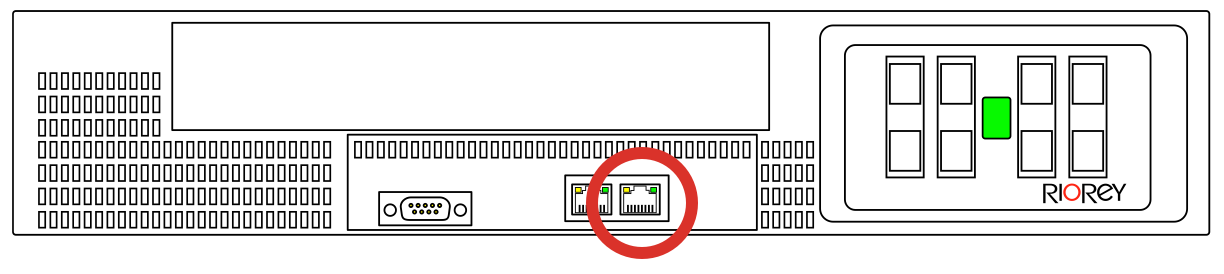
Run this command in your shell or terminal program:
ssh -p8022 rview_admin@192.168.1.1
The prompt should ask you for a password. The default password is: admin123
Execute the following command:
/usr/local/rios/sbin/set_mgmt_ip
Using these items to execute the command:
- ip_address: The management address set aside for your RS unit. It should be in the same subnet as your rWeb server.
- netmask: The mask of your management subnet.
- gateway: The default gateway for your management subnet.
Example
If your rWeb was set in private subnet 192.168.100.0/24 with an IP of 192.168.100.50 and you wanted your RS to have an IP address of 192.168.100.12, your command would look like this:
/usr/local/rios/sbin/set_mgmt_ip 192.168.100.12 255.255.255.0 192.168.100.1
You will receive a message saying the interface is being configured. After a few seconds, your SSH connection should break as the RS40 sets the new IP address.
Disconnect the laptop and plug the RS40 into your management network.
Connect the RS40 to rWeb
- Configure your computer so that it can communicate with your rWeb server, connect it to the appropriate management network, and log into rWeb. Click on Administration>Devices, then hit “Add Device” at the right side of the screen (as shown in Initial Device Configuration). Enter the following:
- Name: Descriptive name for the device.
- IP Address: The IP address you configured for the management port.
- Host Fingerprint: Ignore this field.
- Username: admin
- Password: admin123
- Your RS will soon be displayed in the list of devices managed by your rWeb server. It is recommended that you immediately change the admin password of your RS. To do this, select the RS from the device list. Once your device displays a status of “Connected”, click “Device Configuration”, under “Change Password” enter the old password once and your new password twice, then hit “Update Password”.
- Upgrade your device to the latest version. Click Administration>Devices, then select your device and go to the “RIOS” tab. Hit “Stage New Upgrade”. If the newest version you downloaded in step 1.4 is not shown on the list, hit “Upload to rWeb” and select the file. Once the file is selected and uploaded, hit “Stage”. After a short period the screen should read “Success” and show the RIOS information of the build you uploaded under “Staged RIOS”.
- Click “Upgrade” under “Staged RIOS” and your device should begin upgrading to the latest version. This process may take upwards of ten minutes. After this period of time “Current RIOS” should reflect the version information of the upgrade you just installed.
- Click on the “Networking” tab. Under “Bypass Devices”, hit edit and set each available option (BP 1, 2, 3, 4) to “Bypass”, then click save. This will prevent network disruptions in the next step if there any issues with your device.
Connect RS40 to Network
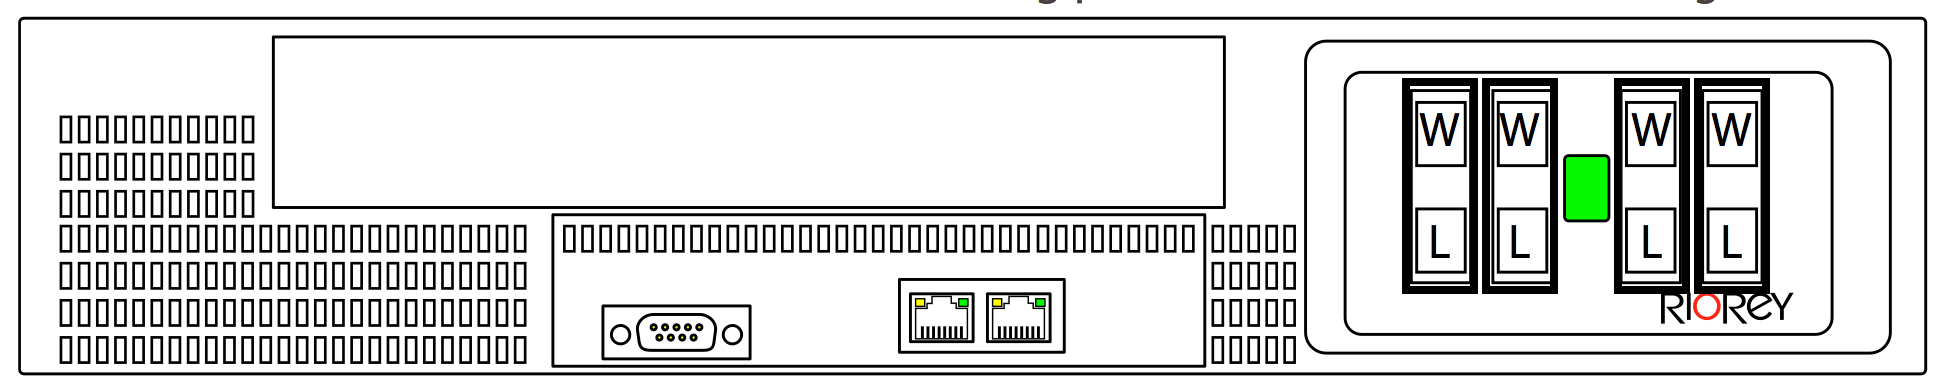 Connect each port pair to your network, using W for the WAN/Exterior Network and L for the LAN/Interior Network being protected.
Once connected:
- In rWeb, go to Administration>Devices, then select your device. Click the “Networking” tab, and change the bypass settings, this time setting each available option (BP 1, 2, 3, 4) to “Normal”.
- Check the “Interface Traffic” section at the top of the page to make sure you are receiving data on odd numbered ports and transmitting data on even numbered ports. For example, you should see numbers under “Rx” on Port 1 and under “Tx” on Port 2, both displaying a status of “UP”. This means your device is correctly set up and is ready to protect your network.
- Your device is now ready. Please refer to the mitigation guide for more information on how to adjust your mitigation settings for the RS40 in rWeb.