rWeb Configurations
This tab lets you configure rWeb's external services, internal disk usage, user authentication, and customize reporting.
To reach this menu, go to the top menu bar under Administration->rWeb then click rWeb Configurations.
Authentication and Users
Authentication Methods
rWeb supports AAA (Authentication, Authorization and Accounting) using Local, TACACS+ and RADIUS servers using role-based access controls. In this section, the user can determine the order of authentication methods and configure RADIUS and TACACS Servers.
To change order, highlight one of the methods (Local, TACACS+ or RADIUS) and select Up button to make primary server or Down button to make secondary server. To enable / disable method(s), highlight the method (Local, TACACS+ or RADIUS) and select Enable or Disable button.
Local users are configured on a per group basis.
If Allow API Key Authentication is enabled, users can make API calls with any valid API Keys.
Log in to OIDC Provider by default presents a dropdown list consisting of None and any configured OIDC Providers. If set to None, users will see the default login screen, allowing them to either attempt a local login or select a provider to use for login. If a provider is selected, users will always be sent directly to this provider for authentication instead of seeing an rWeb login screen. OIDC Bypass URL is the URL to present the login screen as if you had selected None as your setting, permitting users accessing this URL to always attempt a non-OIDC login.
Debug OIDC Authentication will provide additional debug information for the OpenID Connect process if checked. Clients encountering issues will see some of this debug information presented in pop-ups, so this mode is only recommended when first setting up OIDC to aid in troubleshooting.
OpenID Connect Providers
rWeb supports configuring one or more OpenID Connect (OIDC) Providers. This enables a better single sign-on (SSO) experience and more flexible authentication configuration. rWeb uses the OAuth 2.1 Authorization Code flow with PKCE.
A table showing the set of currently configured providers will be shown below the Redirection Endpoint for Providers. This endpoint should be registered in your provider as a Redirection URI.
You can Edit or Delete existing entries from the table. When you click Add, a new provider can be configured:
- Name- The display name of this OIDC Provider. This is used internally when displaying entries in this section.
- Client ID- This is the
client_idthat will be presented to the provider, following the Authorization Code Flow. - Client Secret- This is the
client_secretused during Token Request Validation. rWeb defaults to usingclient_secret_basic. - Metadata URL (Optional)- Instead of filling out all required fields, if the Provider supports using OpenID Provider Configuration Information, you can enter the Metadata URL here to have it query and retrieve the Provider's configuration for required fields (plus optional fields if they are available).
- Issuer- The identity of the OIDC Provider. Must match the
issfield for ID Tokens from this Provider. - Authorization Endpoint- The URL for the initial OIDC Authorization Request. As TLS is required, this must be an 'https' URL.
- Token Endpoint- The URL used for Token Requests. As TLS is required, this must be an 'https' URL.
- UserInfo Endpoint (Optional)- An optional URL used for making UserInfo requests. As TLS is required, this must be an 'https' URL.
- JWKS URI (Optional)- If left blank, the ID Token signature check will be skipped. If this is specified, this URI should return a JWK Set document for the public keys used by the Provider in order to verify and/or decrypt an ID Token.
- Scope- The
scopevalue used when initiating OIDC Authentication Requests. By default this will be filled out with the required value of 'openid'. Additional values (space separated) can be added as denoted in the specification if supported by your Provider. - Username JMESPath- This is a JMESPath matcher used to extract the rWeb username from either the ID Token or the UserInfo response (if configured). This rWeb username must already be present and created within rWeb (it will not automatically be created on login). Depending on your Provider you may wish to leverage some of the existing User API for user creation.
- Logout Method- This can be either Local system logout (in which case the user logs out of rWeb but not their OAuth session) or Disable logout (in which case the user won't have a logout button).
- Post-logout Redirect URI- If allowed to logout by Logout Method, this is the location users will be redirected to. If blank, users will be redirected to a generic logout screen.
RADIUS
On the RADIUS server side, administrators will need to configure RioRey's vendor ID (26537), and a string attribute with value '1'. RADIUS users should be configured with this attribute, the value of which is a comma separated list of roles that the user belongs to.
It is highly recommended you configure users with your role ID. While you can configure your role based on the role name, current behavior is undefined if you have multiple identical role names and may result in a user being given the wrong set of permissions. This will be deprecated in a future release so that you can only configure by role ID .
Freeradius Dictionary example:
VENDOR Riorey 26537
ATTRIBUTE Riorey-Group 1 string Riorey

Riorey Freeradius User example:
bli Crypt-Password := "$..."
    Riorey-Group = "1, infrastructure admin",
    Cisco-AVPair = "shell:priv-lvl=8",
Once this is configured on the server side, you can add the server to rWeb: Administration > rWeb > Authentication Methods. Enable Radius in the list of methods, then add the server to the list of servers.
TACACS+
For TACACS+ users, rWeb checks for an authorization AV (attribute-value) pair named "Riorey-Group". Like in RADIUS, the value should be a comma-separated list of roles that the user belongs to.
It is highly recommended you configure users with your role ID. While you can configure your role based on the role name, current behavior is undefined if you have multiple identical role names and may result in a user being given the wrong set of permissions. This will be deprecated in a future release so that you can only configure by role ID .
tac_plus configuration example:
user = tacacsuser {
    global = cleartext "tacacsuserpassword"

    service = exec {
        Riorey-Group = "1, infrastructure admin"
    }
}
Local Users
This section lets you search through users configured under each group. Users can only be read under this section, not added. If you want to add users you need to add them under the desired group page.
API Key
This section lets administrators monitor current API keys deployed by rWeb users.
Email
SMTP Server Configuration
rWeb can be configured to send outbound messages using an SMTP server.
- Email enabled- Click to enable use of the configured SMTP server.
- Server- The IP or URL of the SMTP server.
- Port- The port used by the SMTP server (typically 25 or 465 with SSL/TLS)
- Description- A descriptive name for the server.
- Timeout- The time in seconds rWeb will allow for an SMTP communication attempt.
- Use SSL/TLS- If enabled, brings up two more buttons that allow you to upload or delete the security certificate used for authentication.
- From Address- The from address for all outbound communications.
- Authentication Type- The type of authentication used to verify the user log in. Most SMTP servers use the option "login".
- username- User name for the account being used on the SMTP server.
- password- Password for the account being used on the SMTP server.
- password confirm- Verification of the password being used.
For Gmail SMTP use STARTTLS over port 587. If you have 2FA configured, you may also need to configure an App Password.
Test Email
This section will let you send a test email from your SMTP server to the specified address. You can send to multiple addresses as long as they are separated by a comma or a new line.
Victim Notifications
This section will let you establish who receives system wide victim notifications. Note that this includes every victim in every zone on rWeb. You may need to adjust victim notification settings to prevent an email flood.
Alert Notifications
If alerts are configured, any relevant alerts will be sent to these addresses.
System Time
Time Settings
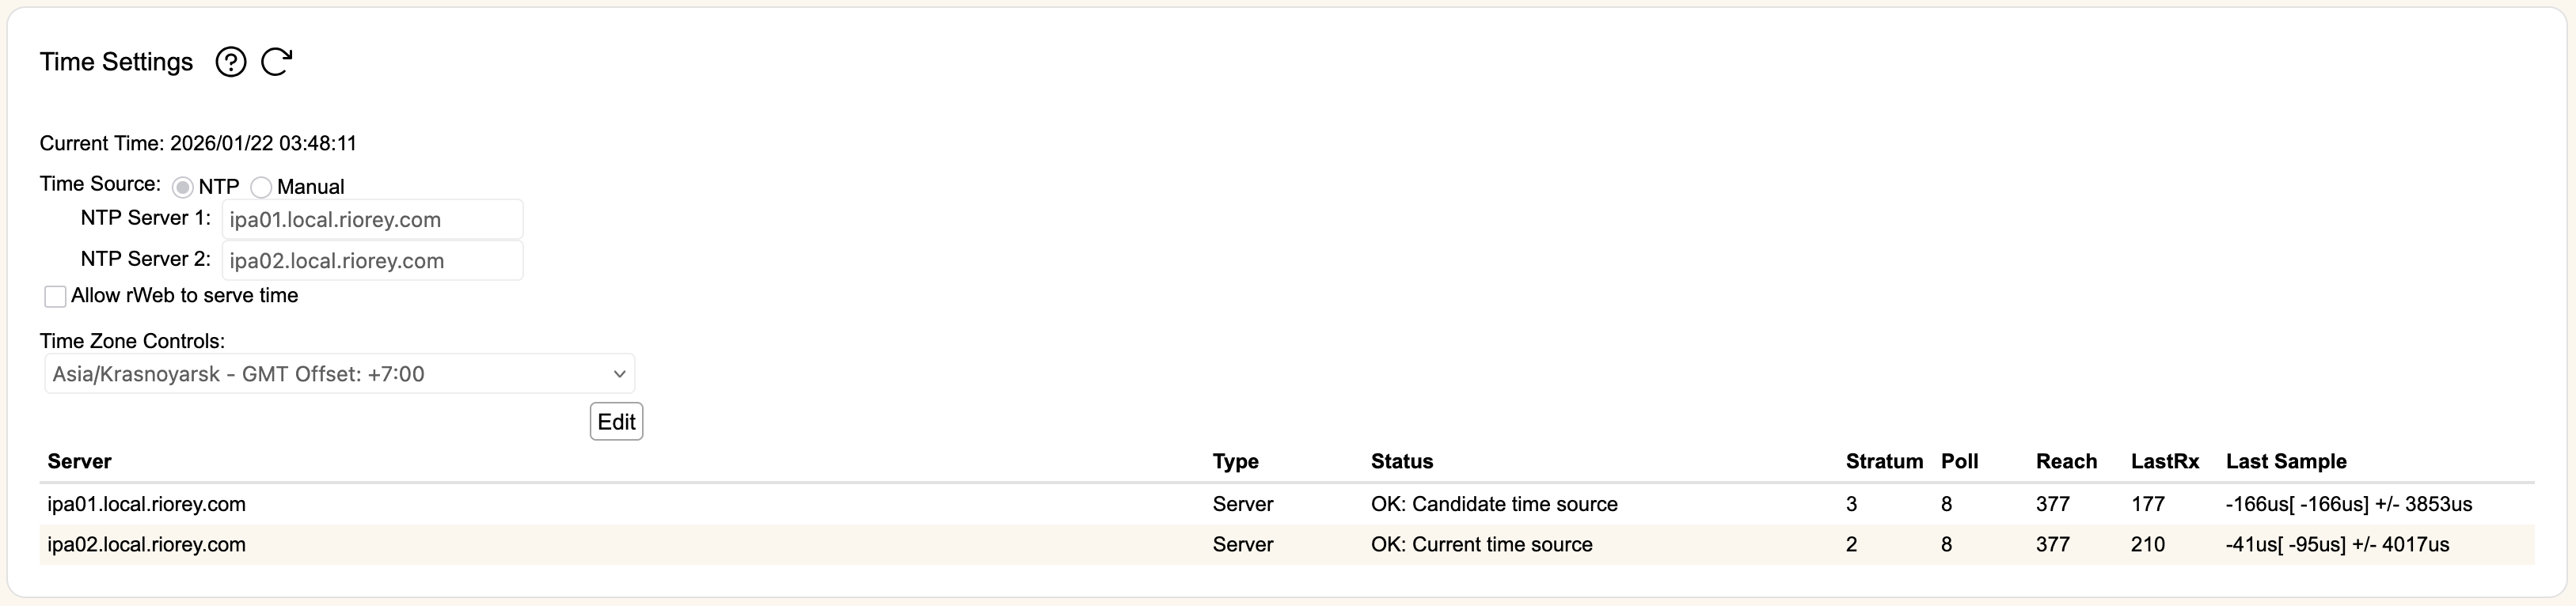
There are two modes of operation: NTP and Manual.
-
When using NTP, rWeb will get time data from the configured NTP servers. Hit Edit to put in new entries for each NTP Server, then hit Save. By default, all RioRey devices point to two NTP servers run by RioRey at rtime0.riorey.com (currently 71.163.122.141) and rtime1.riorey.com (this points to 194.58.204.148, a public NTP server in Sweden). You will see the current status of the NTP servers you have configured. Click the circular arrow icon to re-poll the servers. If you are using these servers, make sure your firewall has the NTP standard port (UDP 123) open for those addresses.
-
In Manual mode, rWeb will use the system time of the rWeb server itself. In conjunction with Allow rWeb to serve time, this lets rWeb serve as an NTP server for RIOS devices without the need for access to external NTP servers.
The option Allow rWeb to serve time lets you configure RIOS devices to use rWeb as an NTP time source. rWeb itself can be set to either NTP or Manual.
Time Zone Controls configures rWeb to use the selected timezone for all display, email, and reporting operations. This setting is global, so all users logging into rWeb will see times reported in the selected timezone. Reports and emails will include the short timezone ID (e.g. EST for Eastern Standard Time) for clarity. The menu option will show the current offset from GMT, but it will automatically account for Daylight Savings Time (DST) changes in the selected timezone.
We highly recommend maintaining your own internal NTP servers. Most NTP services are supported, however in the case of Microsoft NTP please be aware that they don't recommend it for precision timekeeping and depending on its configuration, it may not behave as a proper time server. Please see this Microsoft KB article for more information.
Syslog
Syslog Notification
This section configures the syslog servers to which rWeb will send messages.
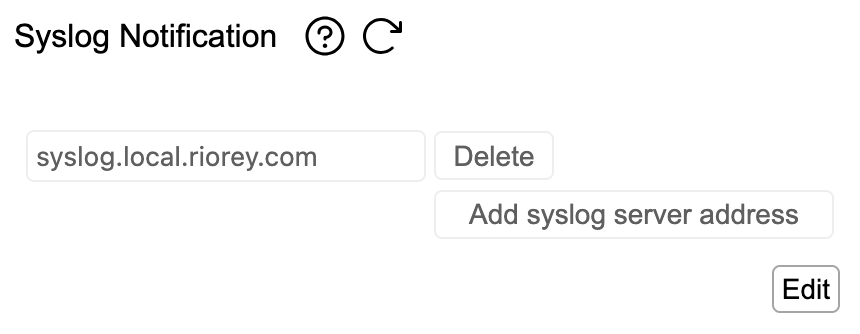
Hit Edit to enable the text boxes and buttons. You can change, delete, or add additional addresses of syslog servers. When done, hit Save to store your changes or Cancel to discard them.
Webhooks
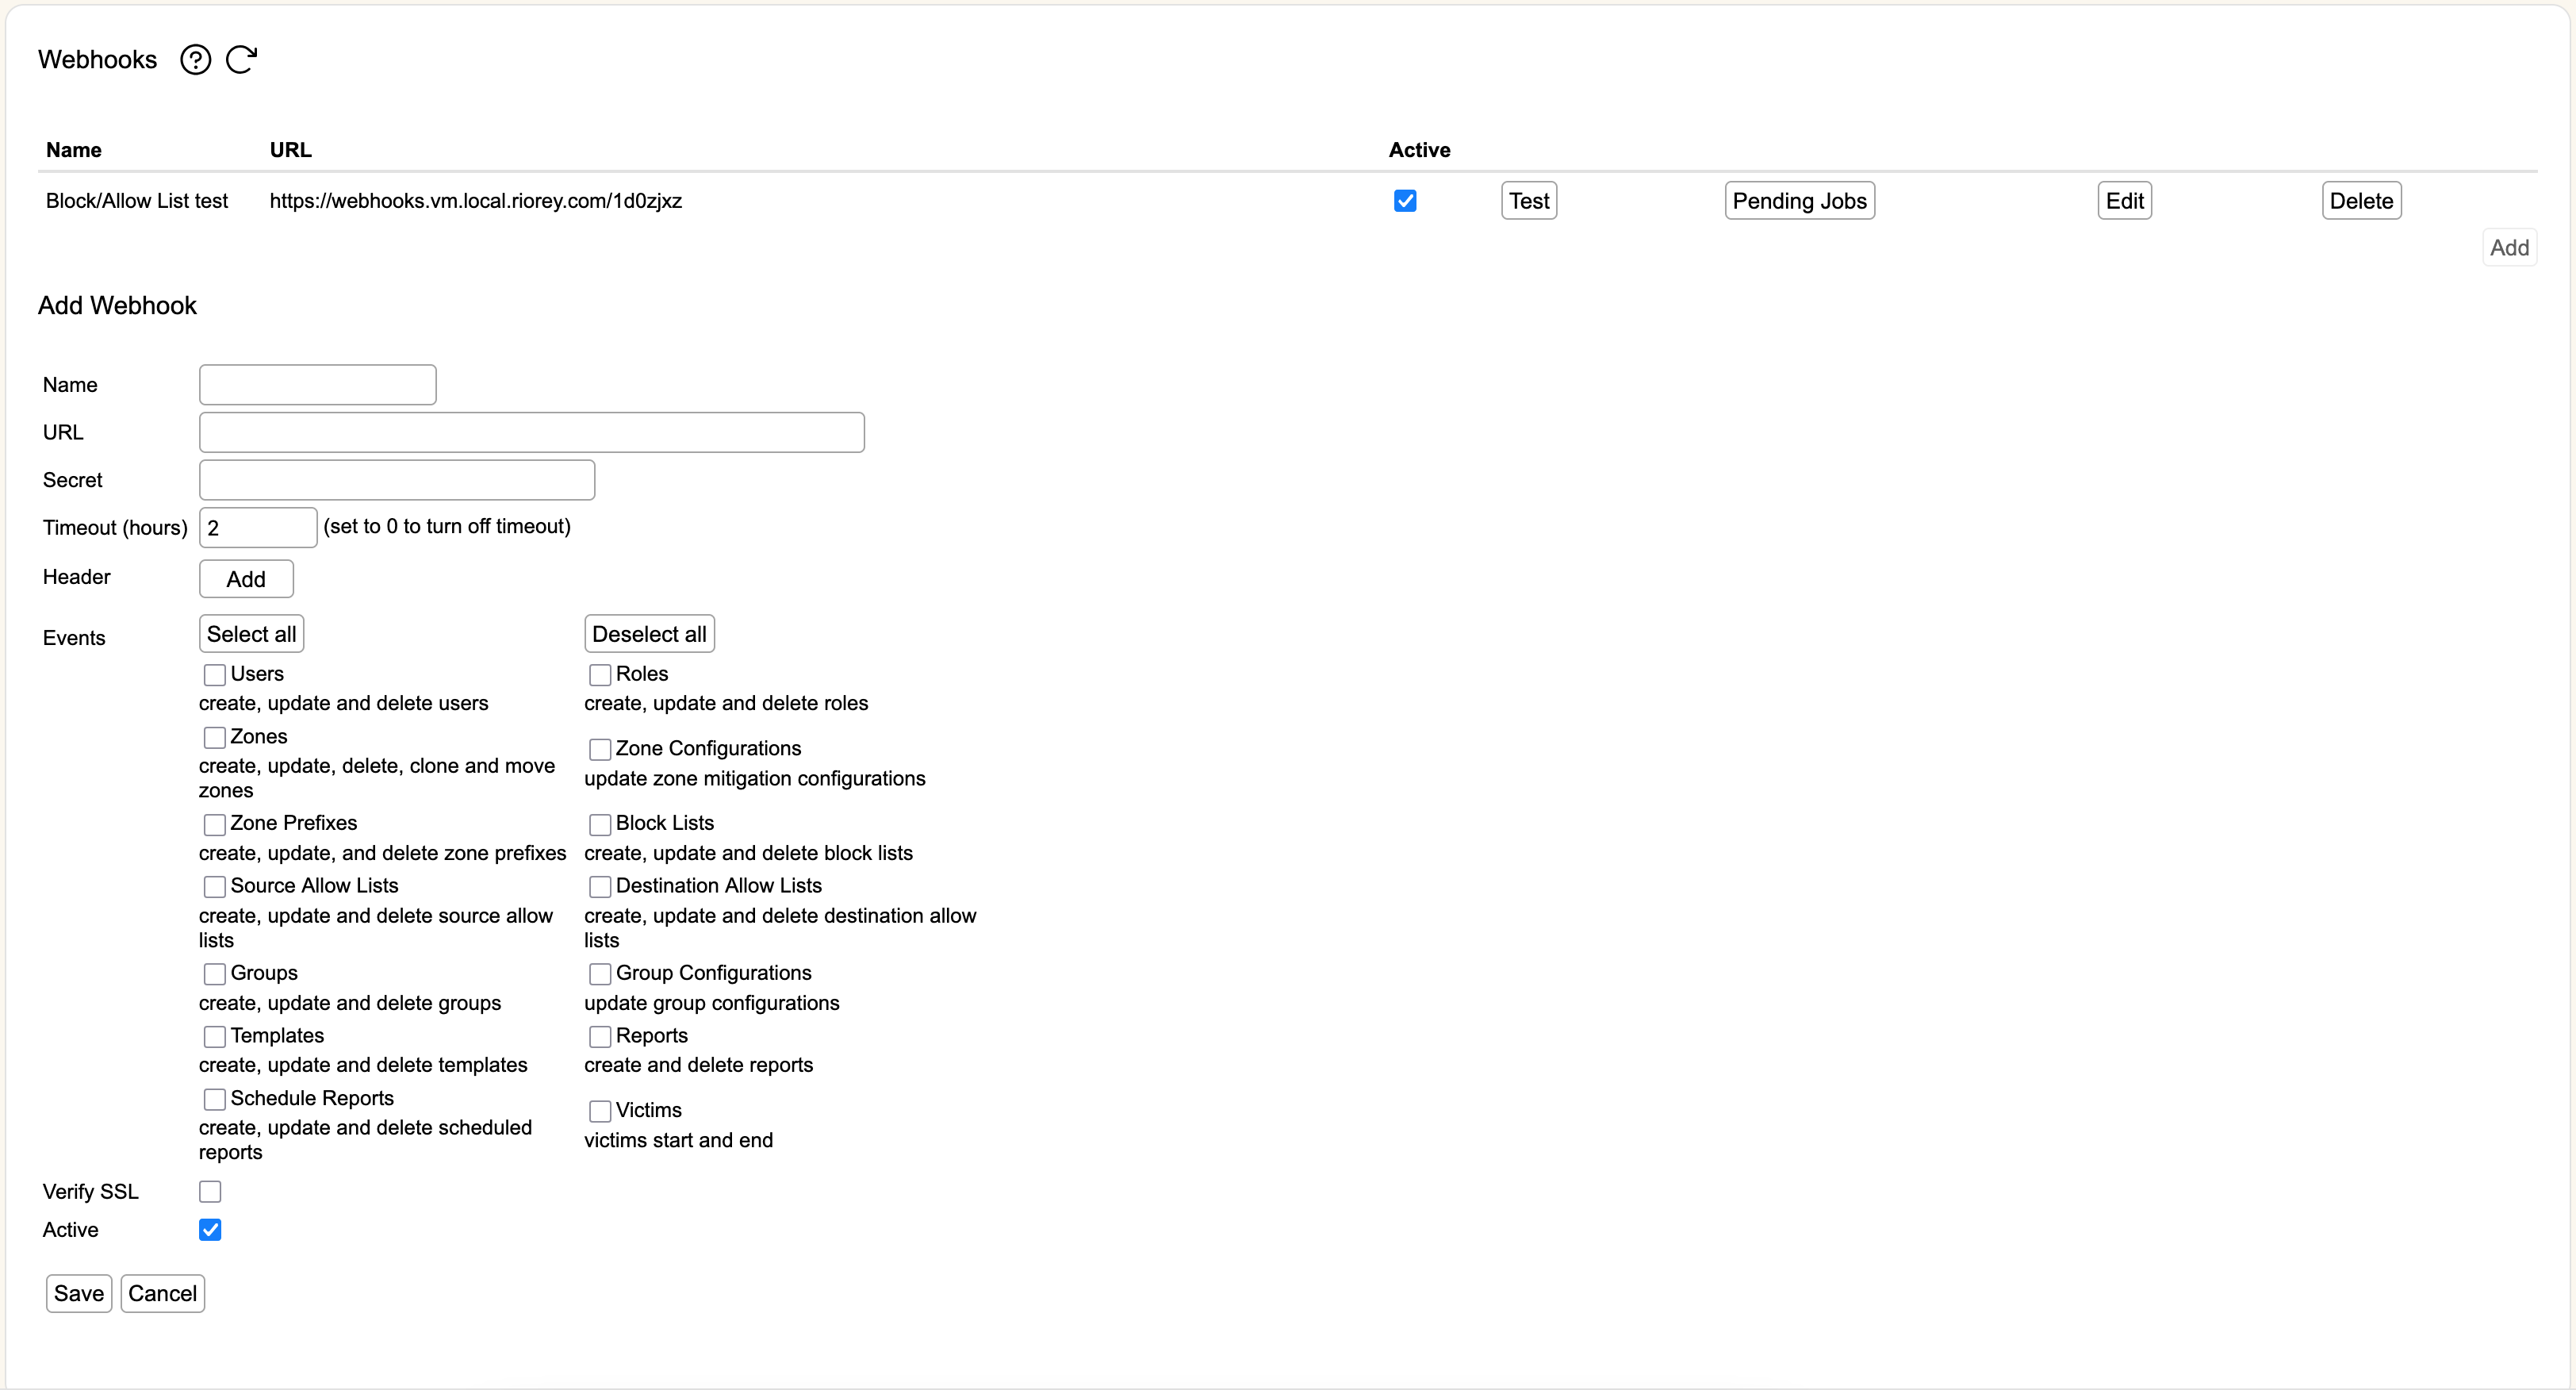
This section shows shows the configured set of webhooks and lets you Add, Edit, or Delete them. In addition, you can Test them (which sends a test event to the configured URL) or view any Pending Jobs.
Configuring Webhooks
When adding or editing a webhook, you can configure the following:
- Name: A descriptive name for this webhook.
- URL: The fully qualified target URL for where rWeb will attempt to POST any configured Events.
- Secret: This can be used to validate that a webhook message has not been modified, especially if it is sent over HTTP or passed to a third party system. An HTTP header called
x-rweb-sigwill be added. The value of this header will be the HMAC-SHA256 digest of the message using the secret, encoded as hexadecimal bytes.- This digest ONLY covers the message payload, not the headers.
- This digest does not provide replay protection on its own. The message ID and timestamp should be used if this is a concern.
- Timeout (hours): If anything other than 0, this is the time in hours for how long a given notification will be kept around for retries in case a notification fails to be successfully POSTed. Any webhooks pending retry can be viewed in the Pending Jobs section. If set to 0, this means any given event will be attempted once and then discarded, regardless of success or failure.
- Header: You can Add and Delete up to 10 additional custom HTTP headers to send as part of a webhook.
- Events: These are the Events in rWeb that will trigger a webhook to fire. You can use Select all/Deselect all to quickly toggle all available checkboxes, or individually mark the set of events you want monitored by this webhook. The full documentation for each event type is available in the Developer Documentation.
- Verify SSL: If checked, this will verify that the target URL (which should be https) presents a correct SSL certificate.
- Active: If checked, this webhook will send notifications on the configured set of Events as they happen. If unchecked it will not actively send notifications, but the configuration can still be used to send Test webhooks (useful for testing initial setup).
Pending Jobs
When you click Pending Jobs, you can see the full queue of events for a particular webhook. You can filter the table by Event Type or view All types at once. For the selected category, you can also Download the events as they would ultimately be POSTed (in JSON format), or you can Clear the queue. Clearing the queue will prevent any further retries of the selected events.
The table shows:
- Event Type: The broad category of the event, as selected during webhook configuration.
- Event: What caused the webhook to fire. For example, deletion of a resource. The set of Events that can happen are specific to the Event Type.
- Status: The reason this particular job is in the queue. In most cases this will be because of a failure communicating with the webhook's target URL.
- Last Attempt: In failure cases, this will be the last time the webhook attempted delivery. Webhooks configured with a Timeout will periodically attempt to retry up until the configured number of hours has passed after the event happened.
Online Service
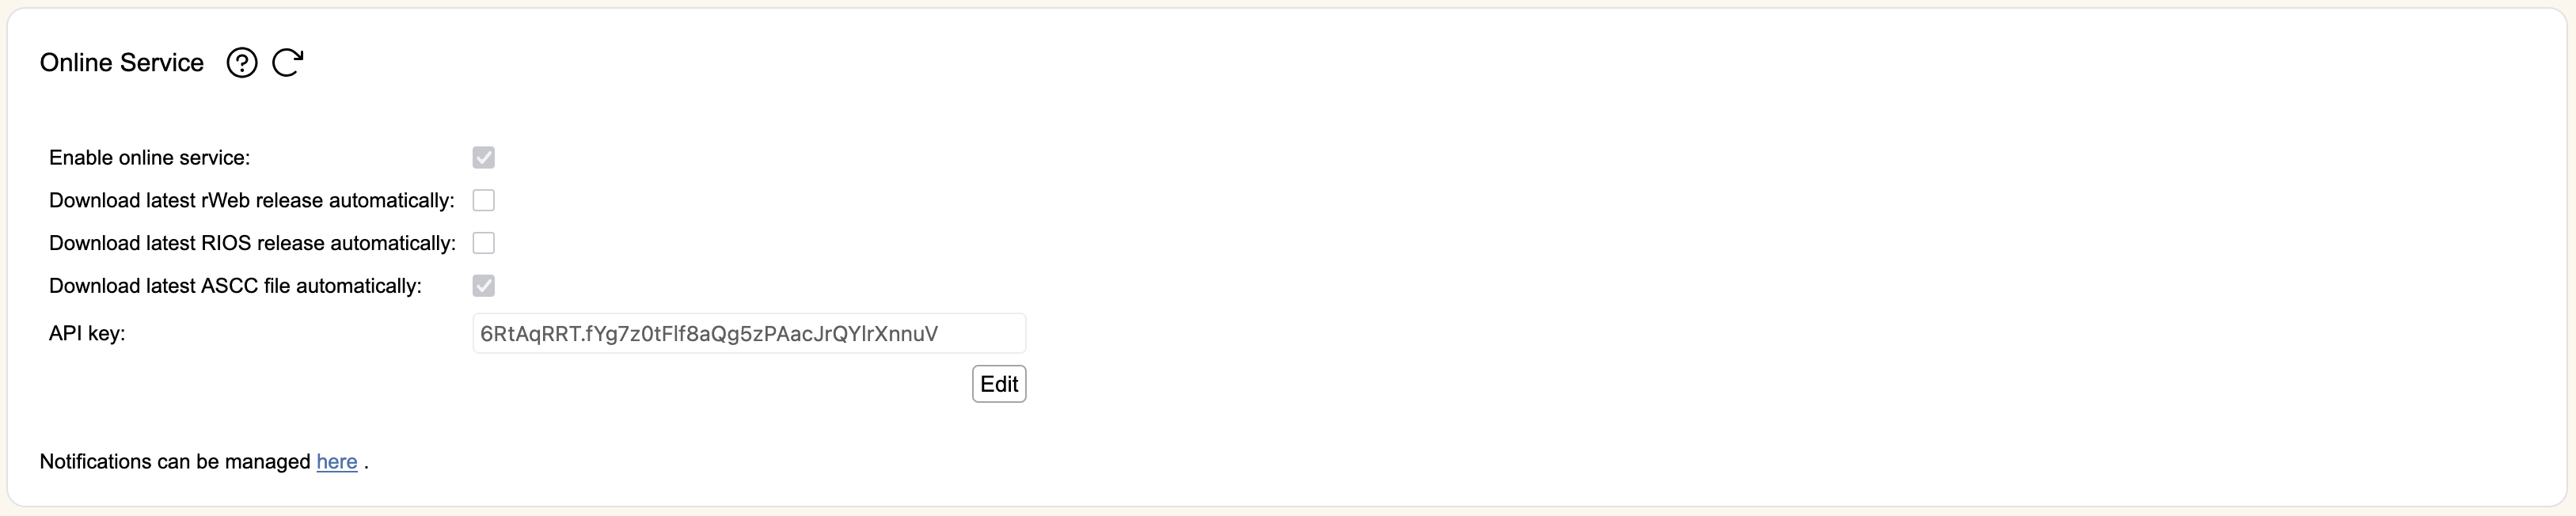
rWeb can automatically check for and download new RIOS and rWeb upgrade files, as well as the latest AS/CC file. Your rWeb needs to be able to reach login.riorey.com over standard web ports, and will only attempt to do so if you enable this option.
In order to use this service, make sure Enable online service is checked along with the set of operations you want to happen automatically. Unchecked options will still notify you of updates but will not download them automatically. For the checked options:
- rWeb releases that are downloaded will be an additional option for staging on rWeb upgrade
- RIOS releases that are downloaded will be available under RIOS management as if you had uploaded them directly
- AS/CC updates that are downloaded will be applied automatically
If opting in for AS/CC updates and using an rWeb VM, make sure your rWeb meets our "recommended" requirements and is not using the "minimum" values.
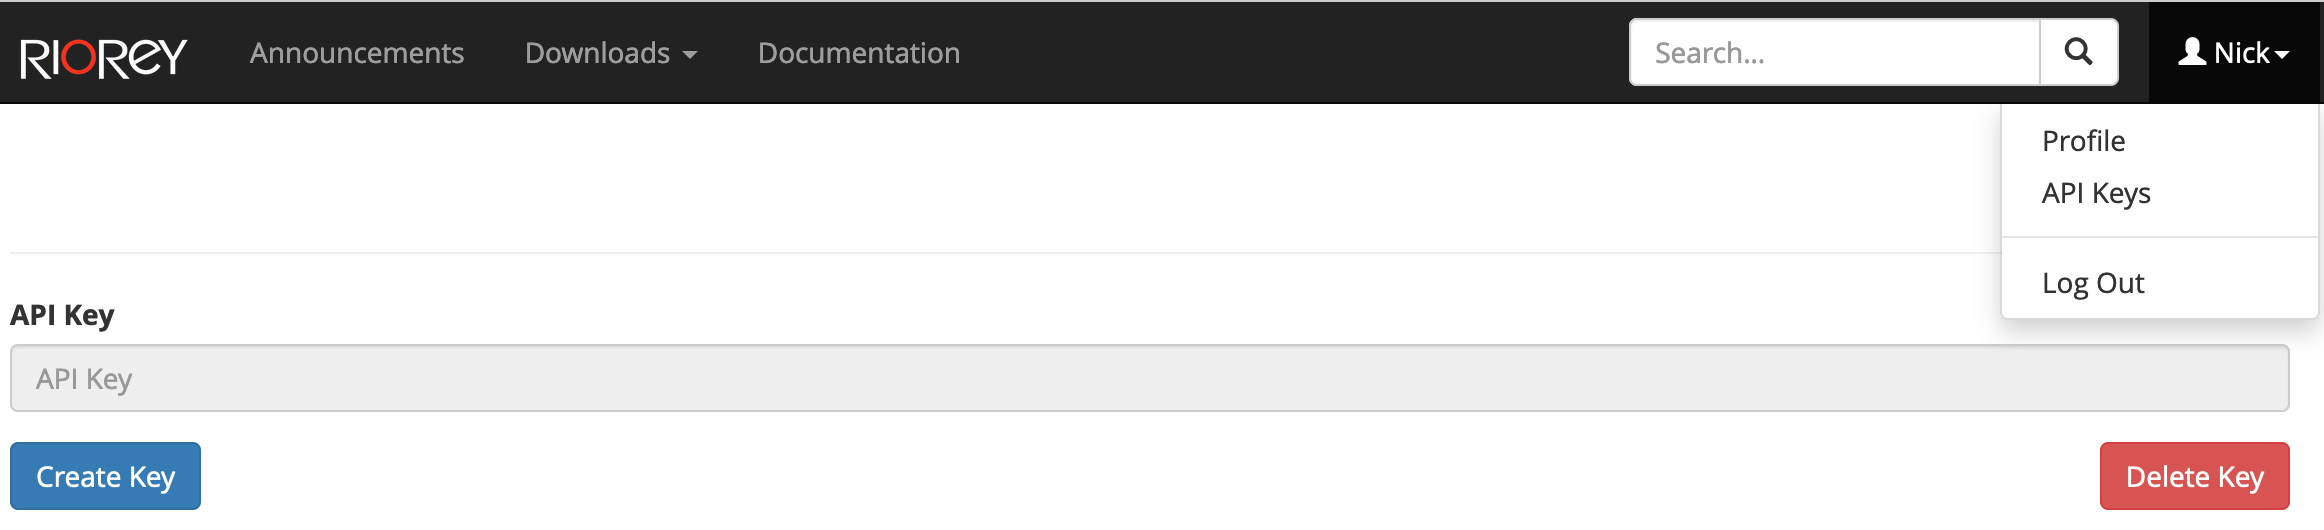
You must also generate an API key on the login site by first logging in, then clicking the top right profile icon and selecting "API Keys", and finally hitting "Create Key" and copying it into the API key line shown above. The key generation screen on the login site is shown for reference below. You can delete the key at any time to revoke access.
Customization
rWeb Customization
rWeb's title, logos, favicon, and overall style can be customized. Reports can be customized with a new logo.
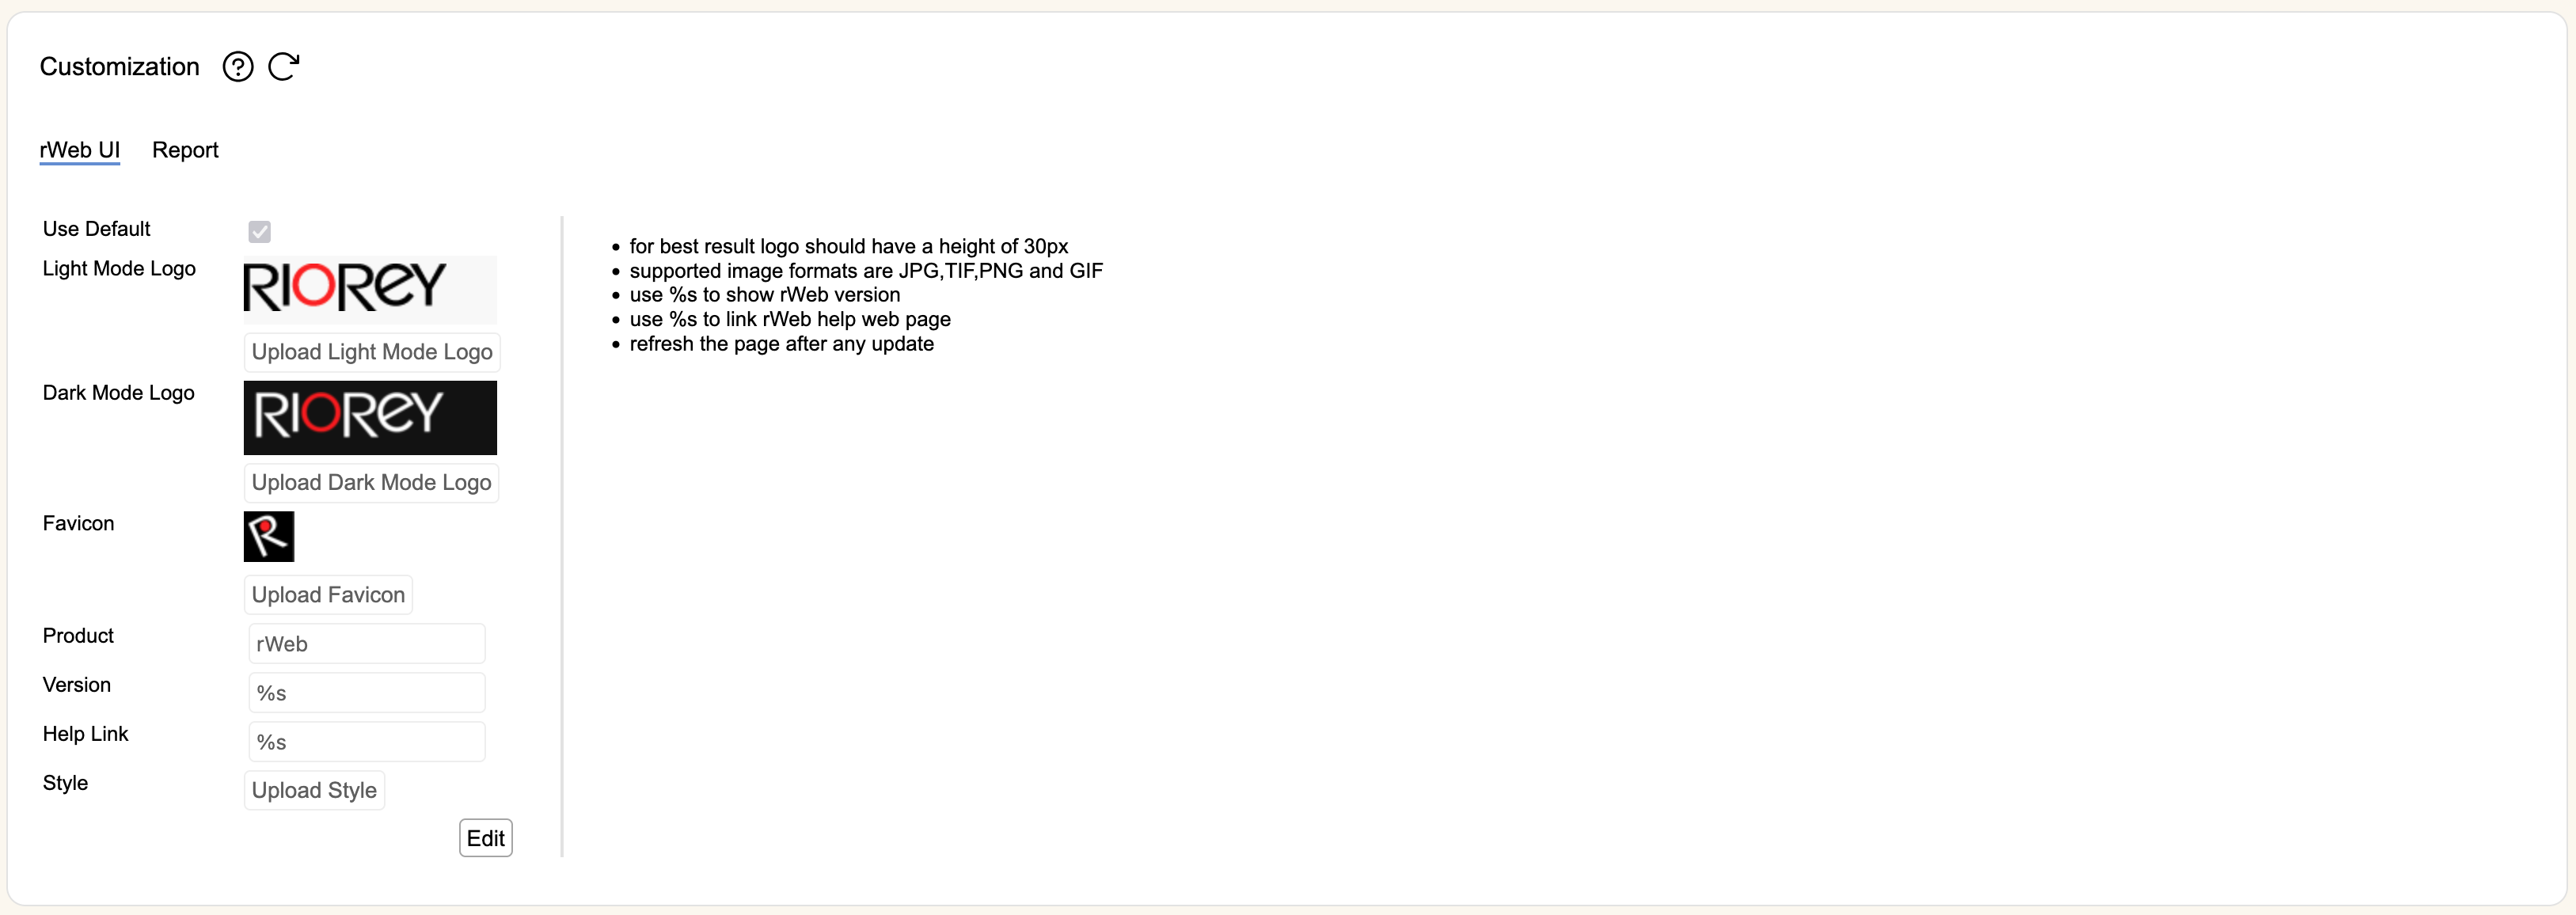
Hit Edit to change the header logo, title, and favicon used by rWeb. Clicking Use Default will use the default RioRey setup that is installed with rWeb. You can Upload Logo (Light or Dark Mode) and Upload Favicon to change the graphics used, subject to the restrictions shown on the page.
A custom stylesheet can also be uploaded in this section. When uploading a new stylesheet, it will be used to customize rWeb's overall appearance for all users. More details on what can be set in the stylesheet are available here. Clicking Download will provide a copy of the currently applied custom stylesheet. Clicking Reset will clear any previously uploaded stylesheet, reverting back to rWeb's default styling.
You can also change the Product and Version shown in the header bar. Changing the Help Link will point the "?" icons to your selected page rather than this documentation.
Report Customization
Hit Edit to change your report logo. Clicking Use Default will use the default RioRey logo that is installed with rWeb. You can Upload your own logo, provided it meets the restrictions shown on the page.
Once you are done making changes, hit Save.
Data Retention
Disk Usage
This section shows you the current disk usage of rWeb, as well as set limits on how long non-essential configuration and historical data is stored by rWeb.
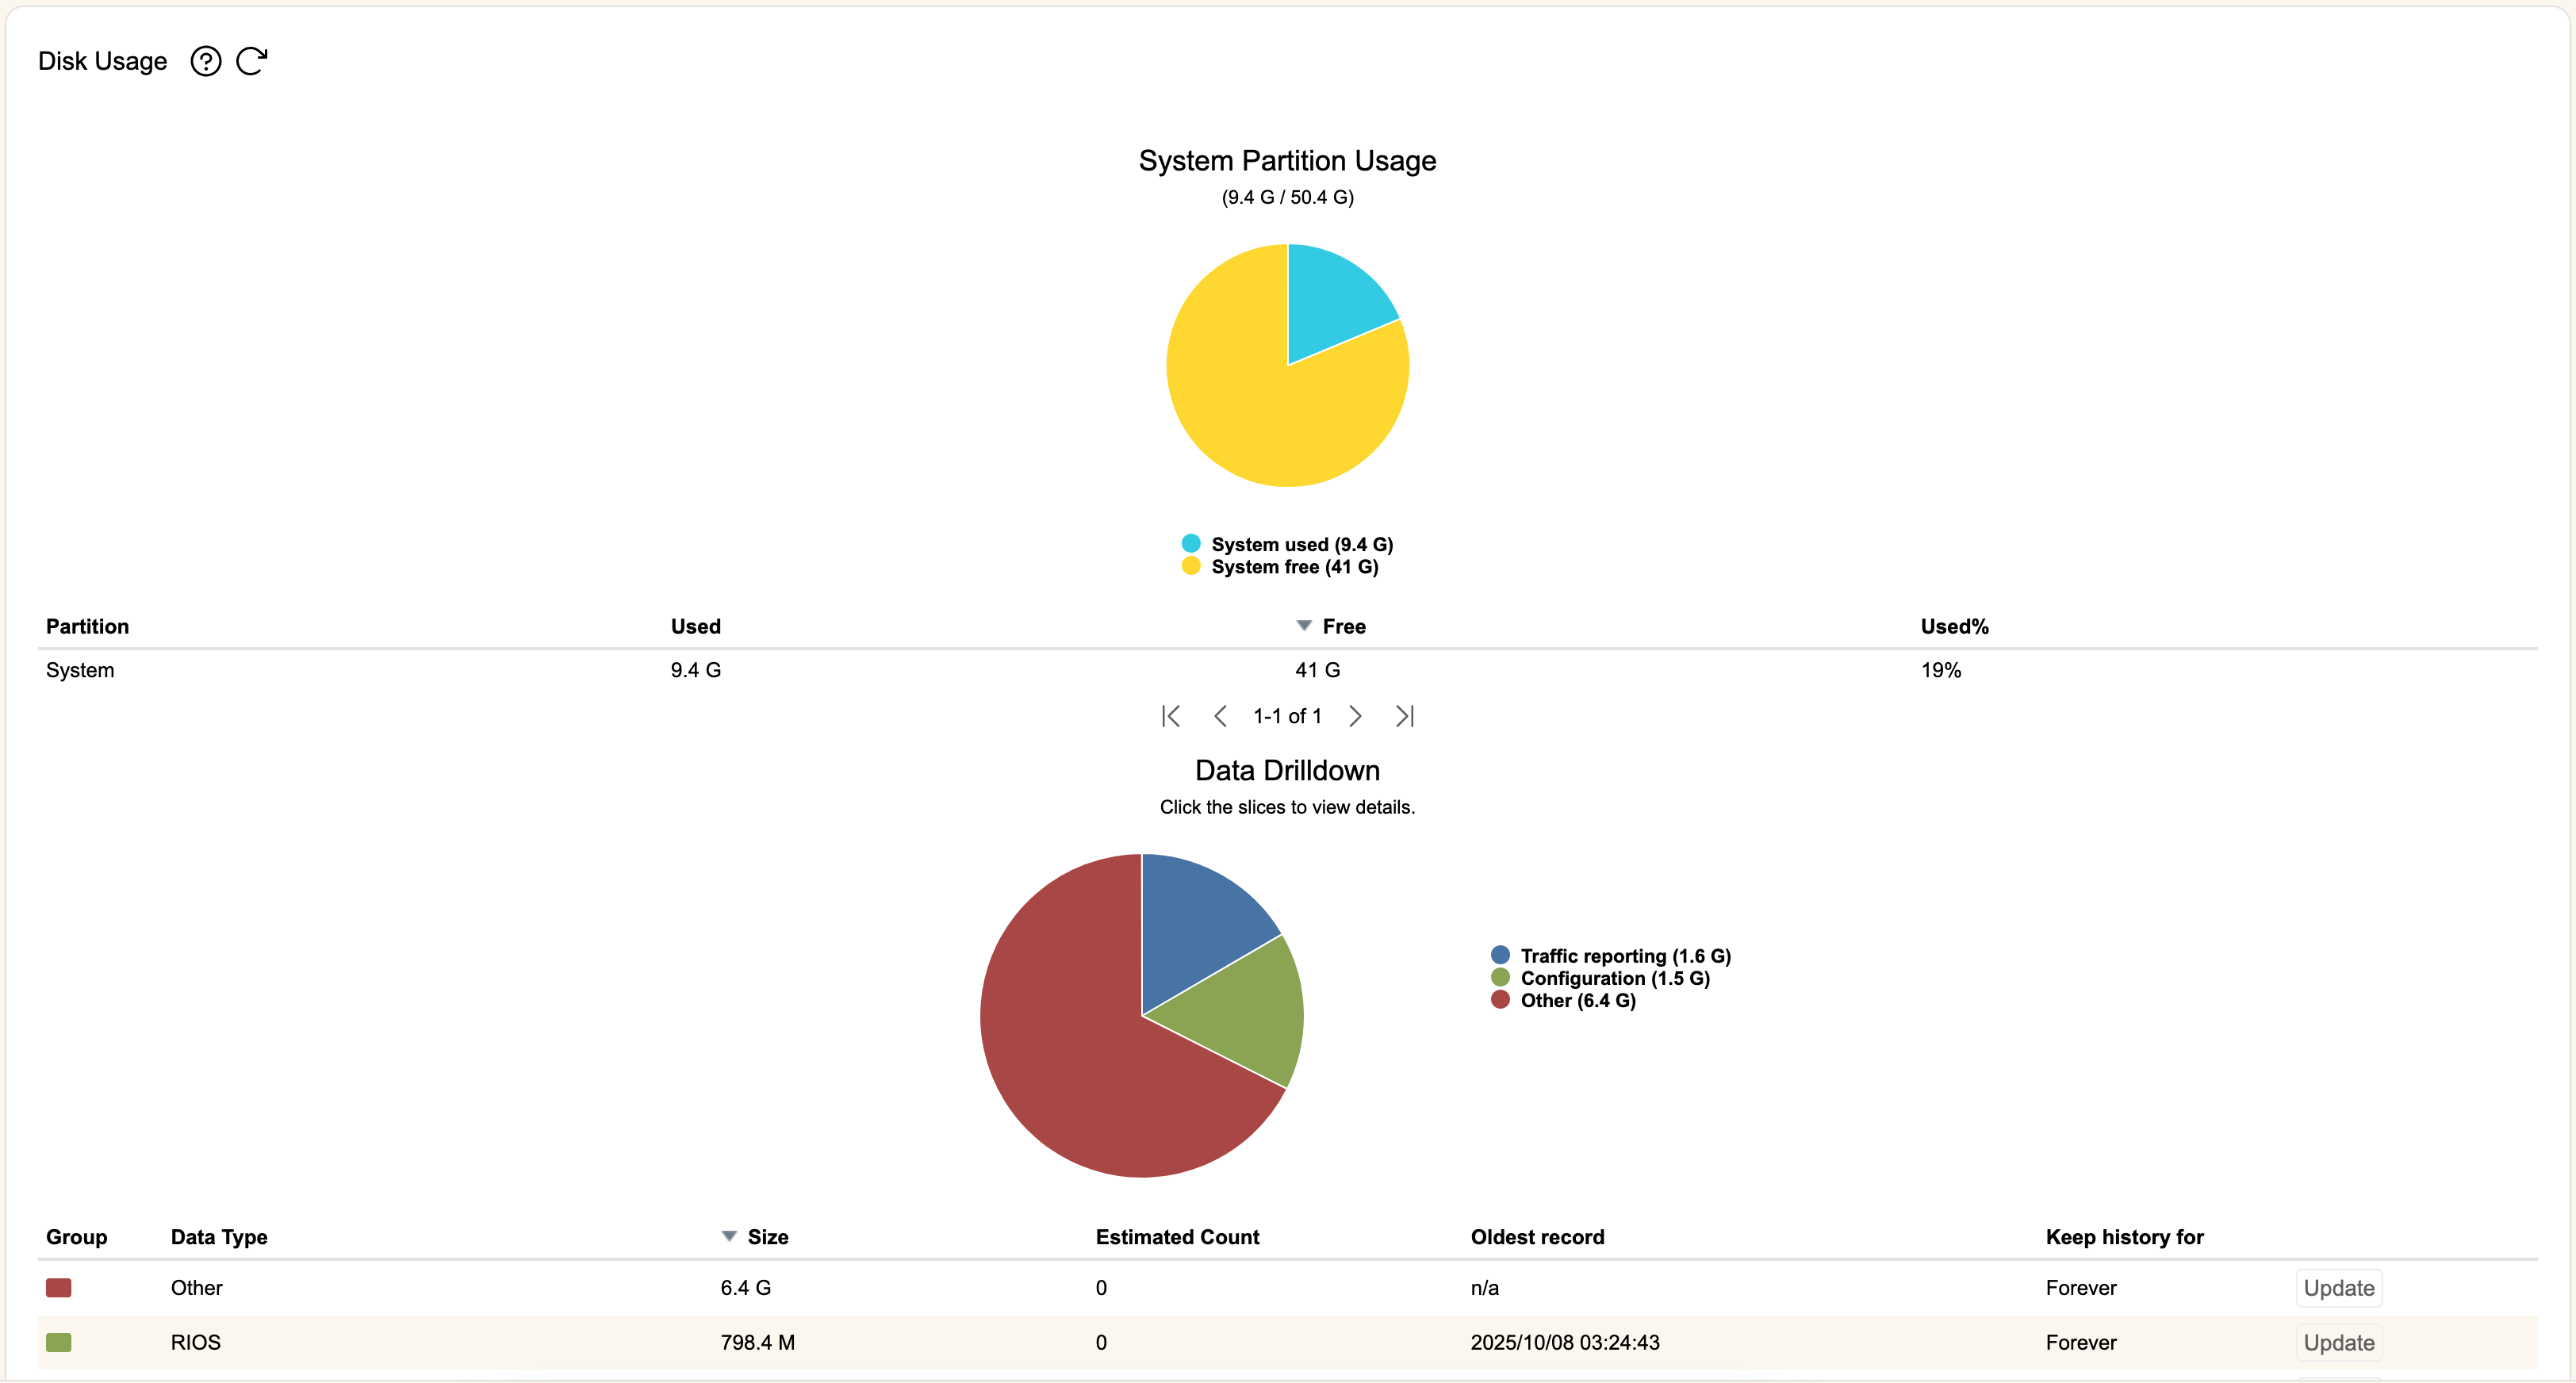
The top graphs show the Data Partition and System Partition usage by rWeb. The used versus free disk space are represented in pie graphs.
The Data Partition Drilldown shows the complete breakdown of used space in the data partition, and can be clicked on to show how much information is stored for each of the Traffic Reporting, Configuration, and Other categories.
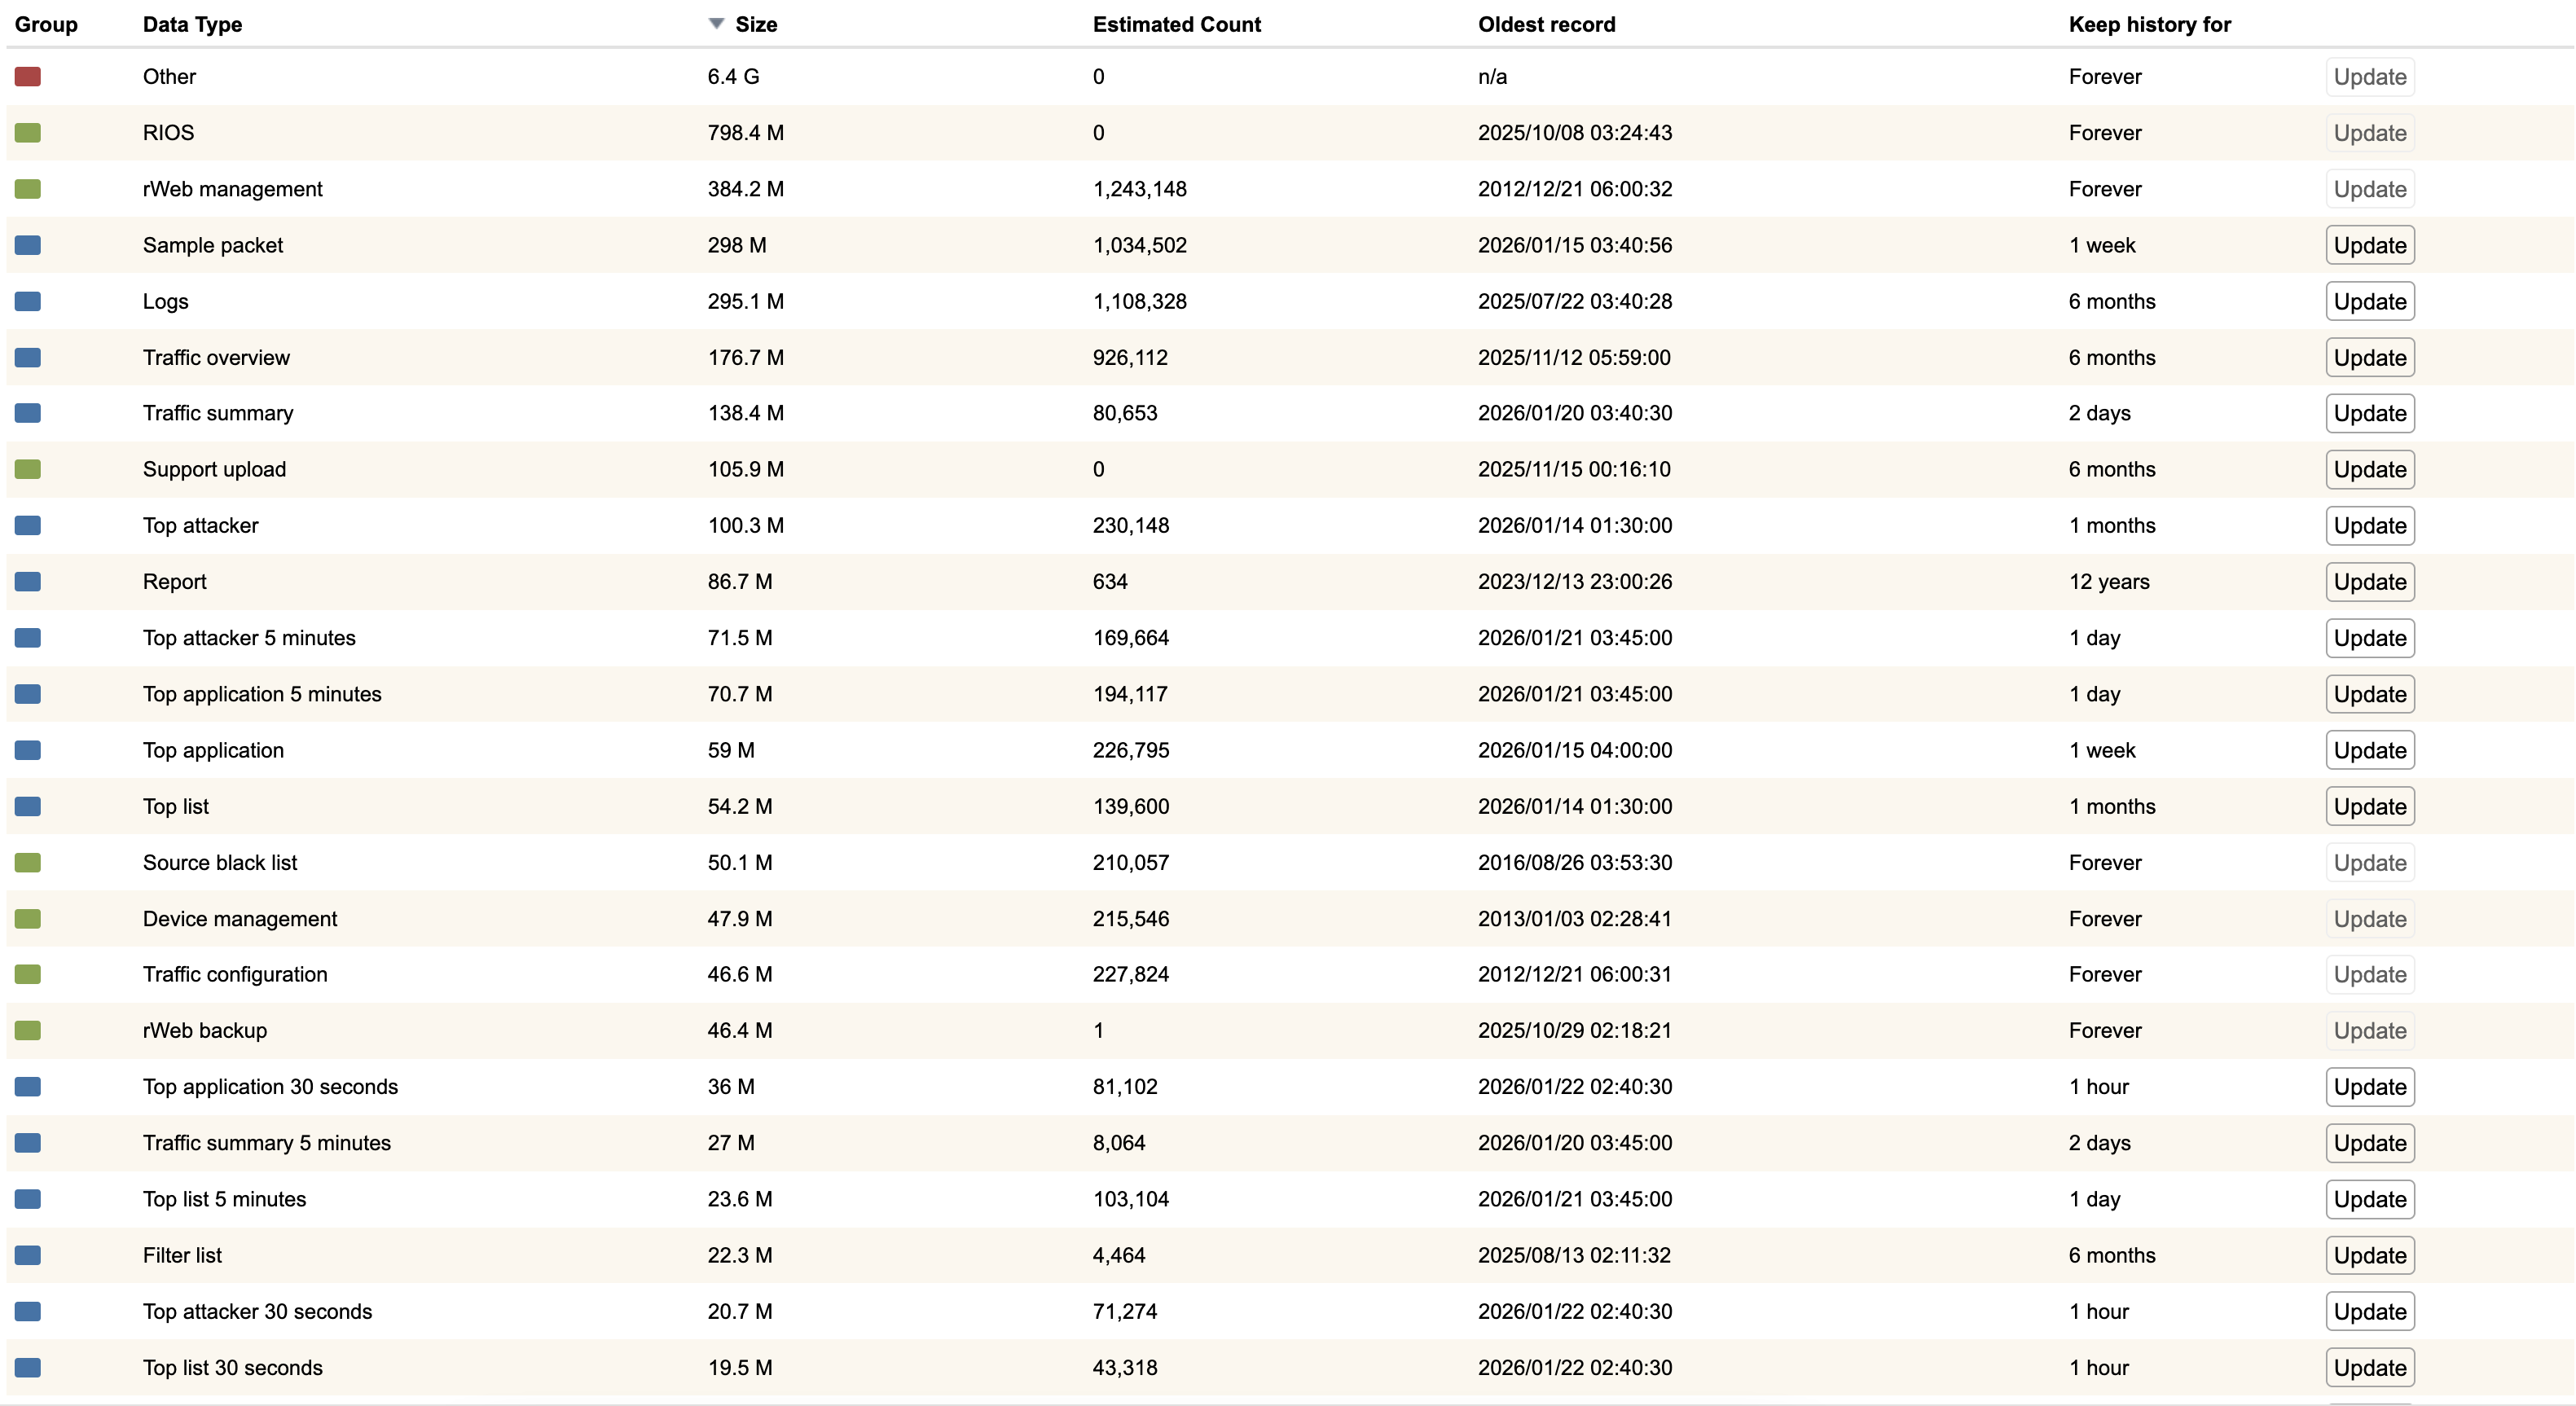
Below the drilldown is a table displaying how long specific information is saved in disk. Each entry displays the following information:
- Group- This will be either Traffic Reporting, Configuration, or Other.
- Data Type- The specific type name of the data. You can search for the specifics of each data type within the documentation.
- Size- The size of the data currently stored on the data partition.
- Estimated Count- This displays either the number of entries within rWeb's internal database, or the number of discrete files saved, depending on the Data Type.
- Oldest Record- This displays the oldest timestamp found of the relevant Data Type.
- Keep History For- This displays how long rWeb will store the associated data type. Hitting Update will open a popup window allowing you to adjust the amount of time that Data Type is saved or immediately delete all stored data.
Entries that have the Update button greyed out can not have their settings adjusted or data deleted. More detailed information on the categories shown in the disk usage section is available here.
Metrics
rWeb exports a set of Prometheus metrics at the listed Metrics URL by default. The default URL will be the HTTPS address for your rWeb plus :8000/metrics. Clicking Edit allows you to change whether the metrics export is Enabled or not.
SSL Certificate
SSL
This section lets you manage the SSL certificate used by rWeb.
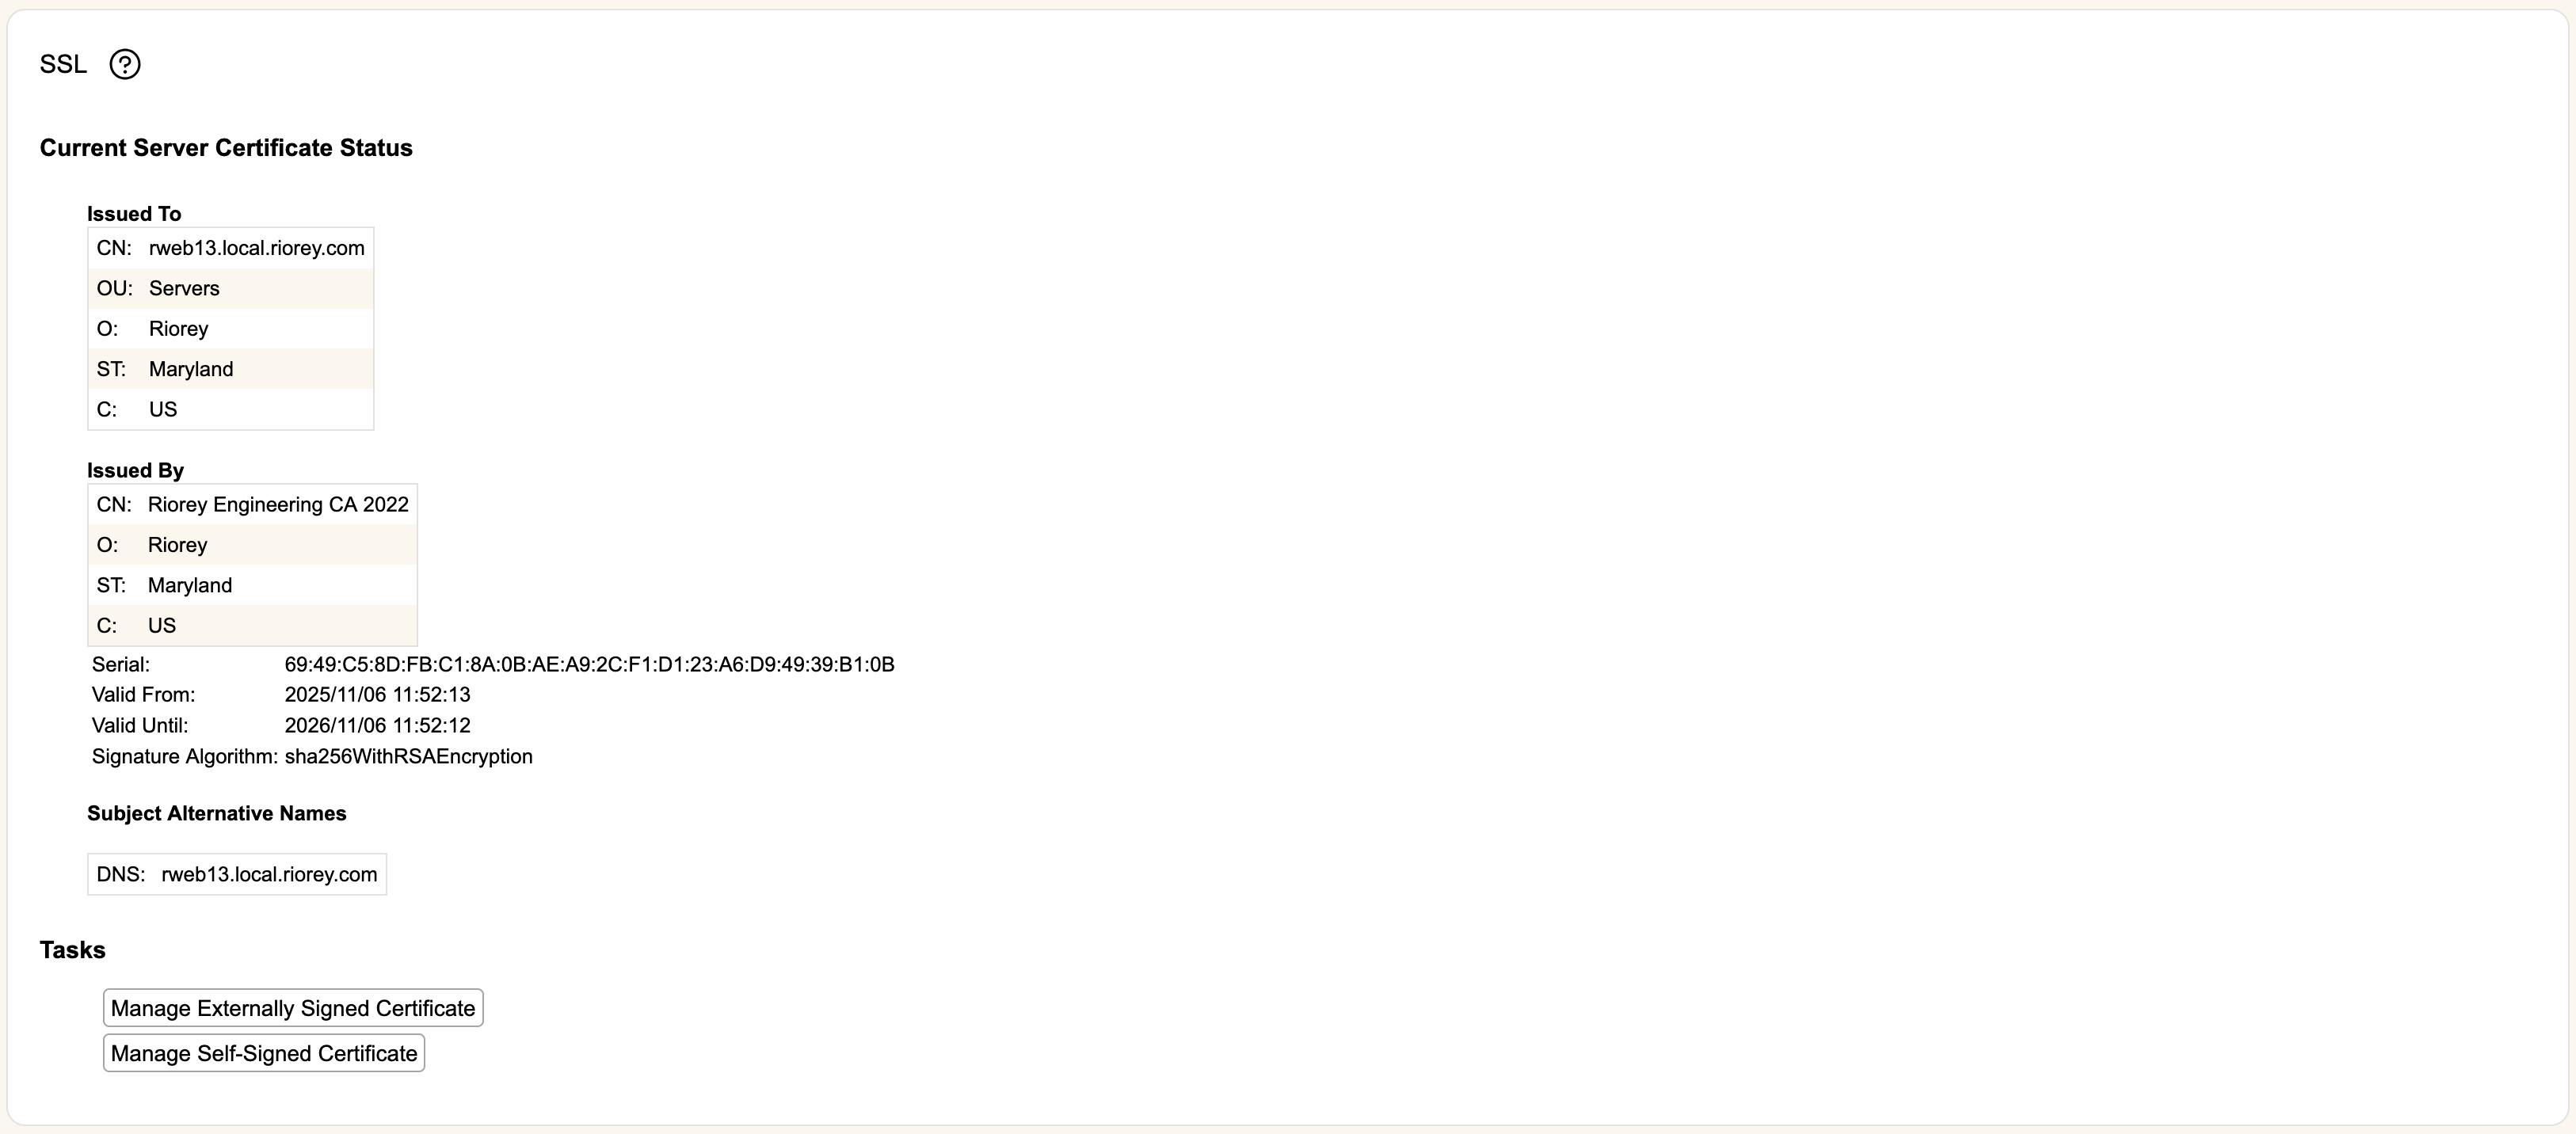
The Current Server Certificate Status sections shows all available details about the current loaded certificate used by rWeb.
Click Manage Externally Signed Certificate to walk through the steps required for loading a certificate assigned by an external Certificate Authority (CA). This is recommended for rWebs that are available publicly on the Internet.
Click Manage Self-Signed Certificate to walk through the steps required to load a self signed certificate.
After loading a new certificate, a hard refresh of your browser is recommended to ensure you are connected via the new certificate.
rWeb supports private keys using RSA with 2048 bits or more, or EC keys using curves X25519, prime256v1, or secp384r1.
Certificate Authorities
This section lets you add trusted Certificate Authorities that will be used by rWeb when making external requests (e.g. outgoing email) to verify authenticity of remote servers.
Click Upload Trusted CA to open a file browser dialogue, and select the CA file (in PEM format) to upload it.
Once uploaded and verified, the name of the new CA will be visible with a + symbol next to it. Clicking the + symbol will open a more detailed view of the certificate, allowing you to either Export the certificate as a .pem file, or Delete it to remove it from rWeb's set of CAs.